Connect Ashby and push to a job
Create an Ashby API key, paste it into Pickle once, then send prospects into Ashby or straight onto an open job.
Ashby connects with an API key that you generate inside Ashby and paste into Pickle. Set it up once and you can send candidates from any prospect list into Ashby, either as general candidates or applied to an open job.
Create an API key in Ashby
You need an Ashby admin account for this part. If you can't see Admin in Ashby's top bar, ask an Ashby admin at your company to do these steps or to grant you access.
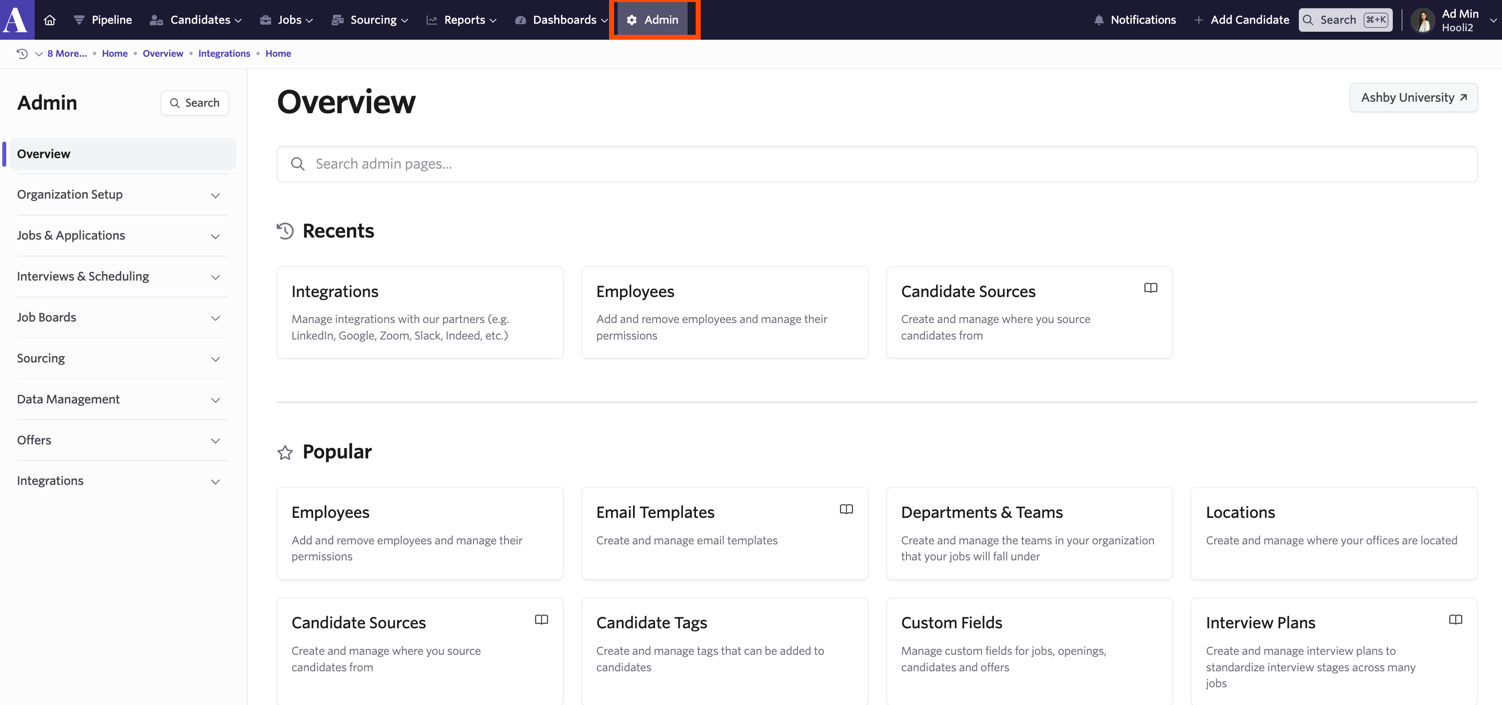
- Sign in to Ashby and click Admin in the top navigation bar.
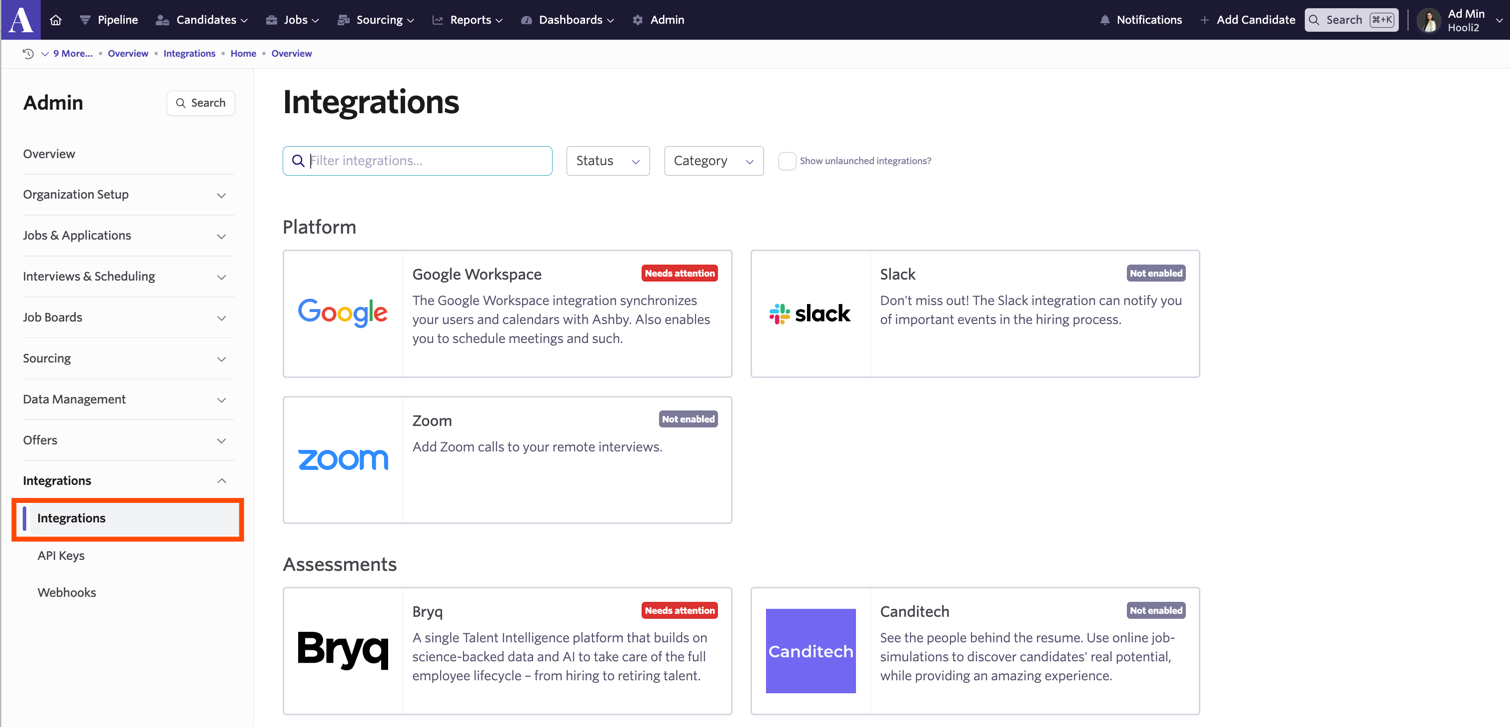
- In the left panel, open Integrations, then click Integrations again in the list that expands.
- Find Pickle in the integrations list. The Filter integrations… box helps, then click the Pickle card.
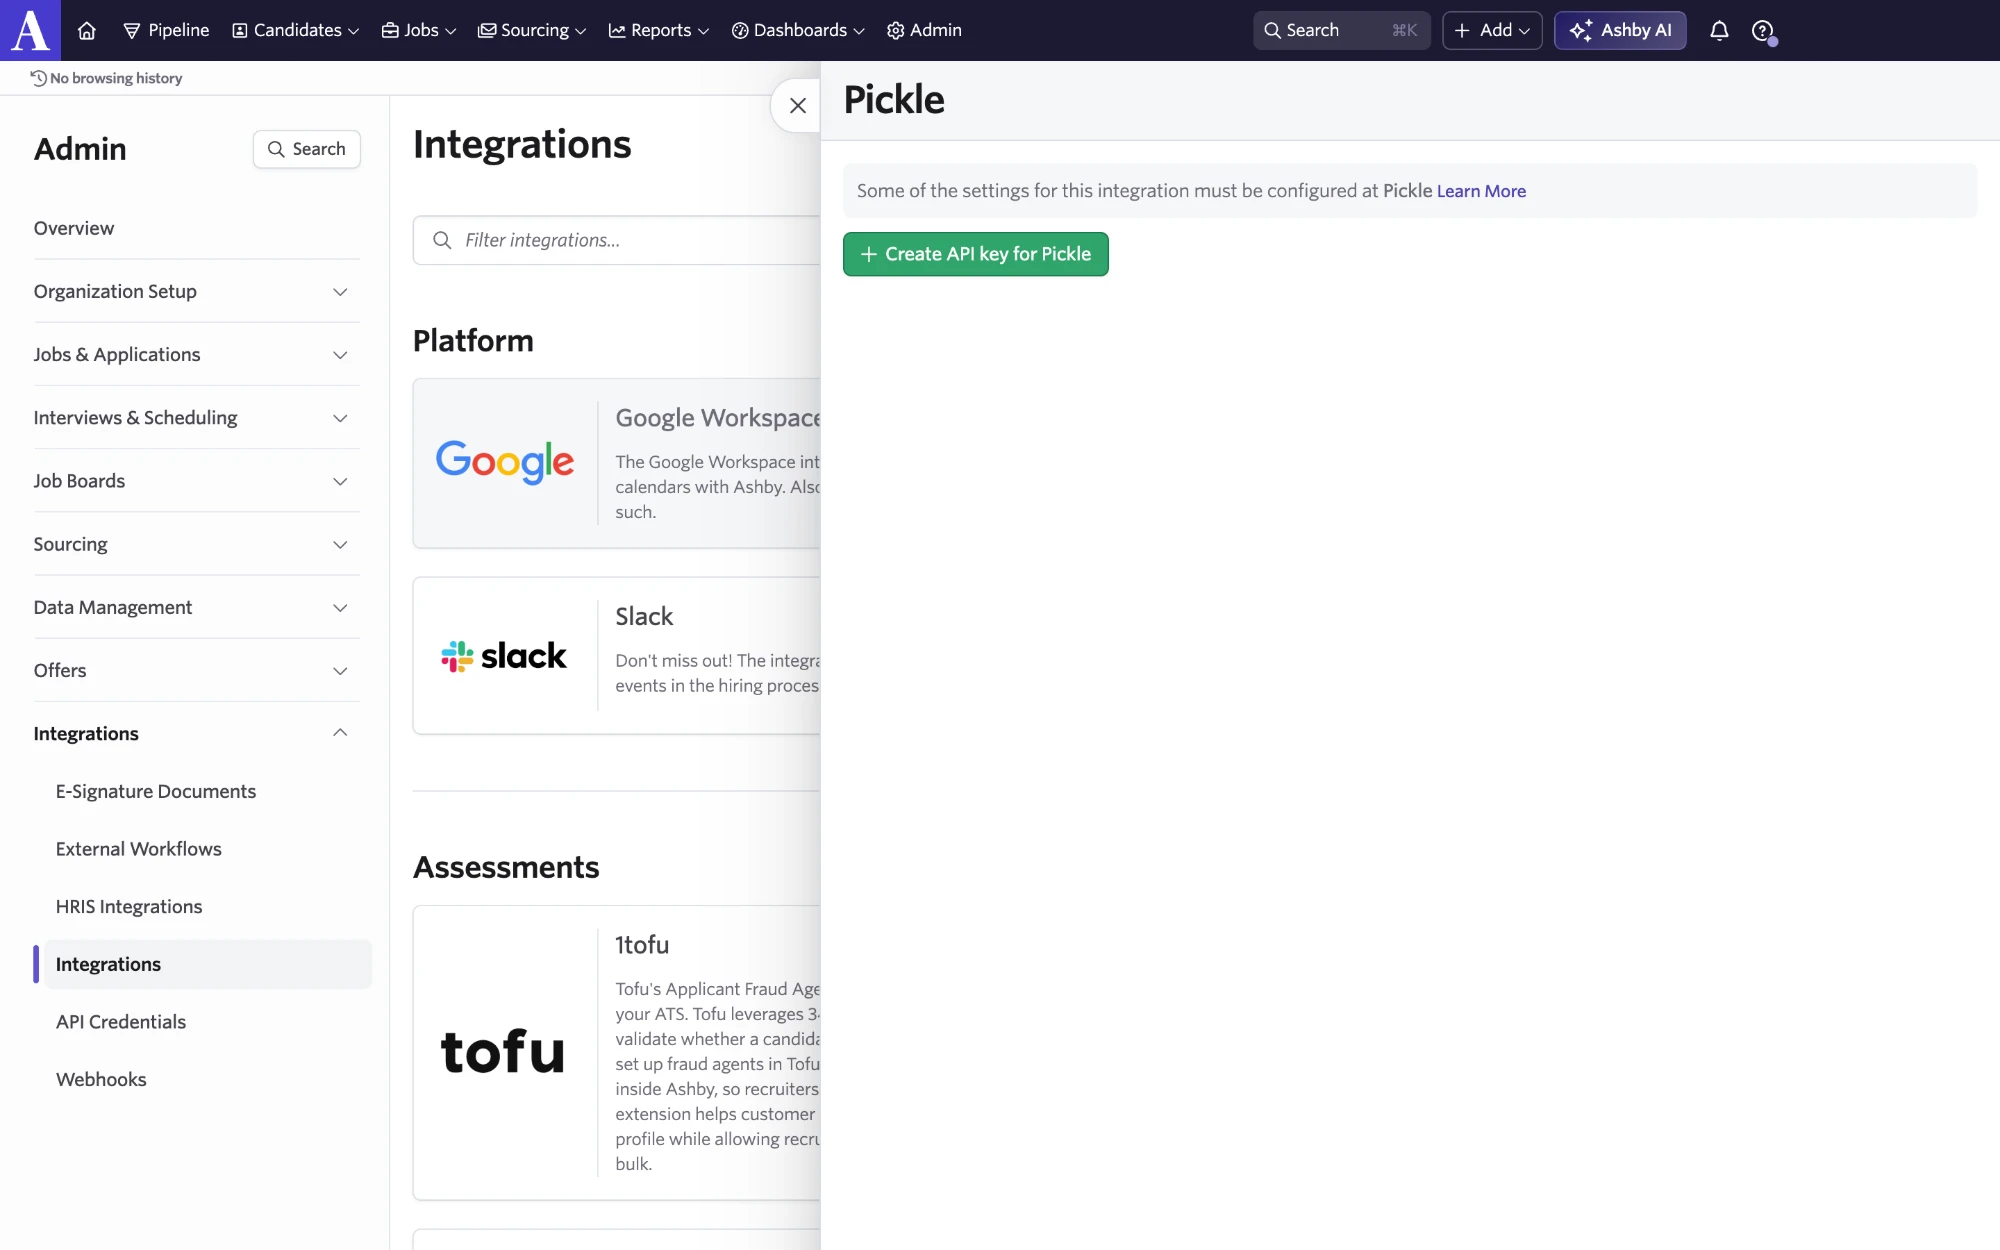
- In the panel that opens, click Create API key for Pickle.
- Copy the key and save it somewhere secure, since you'll paste it into Pickle next.
Pickle needs these permissions on the key. If Ashby asks you to choose permissions when you create it, turn these on:
- Candidates: read and write
- Jobs: read
- Hiring Process Metadata: read and write
- API Keys: read
The API Keys read permission is easy to miss. Pickle uses it to confirm the key works when you connect, so a key without it is rejected.
Add the connection in Pickle
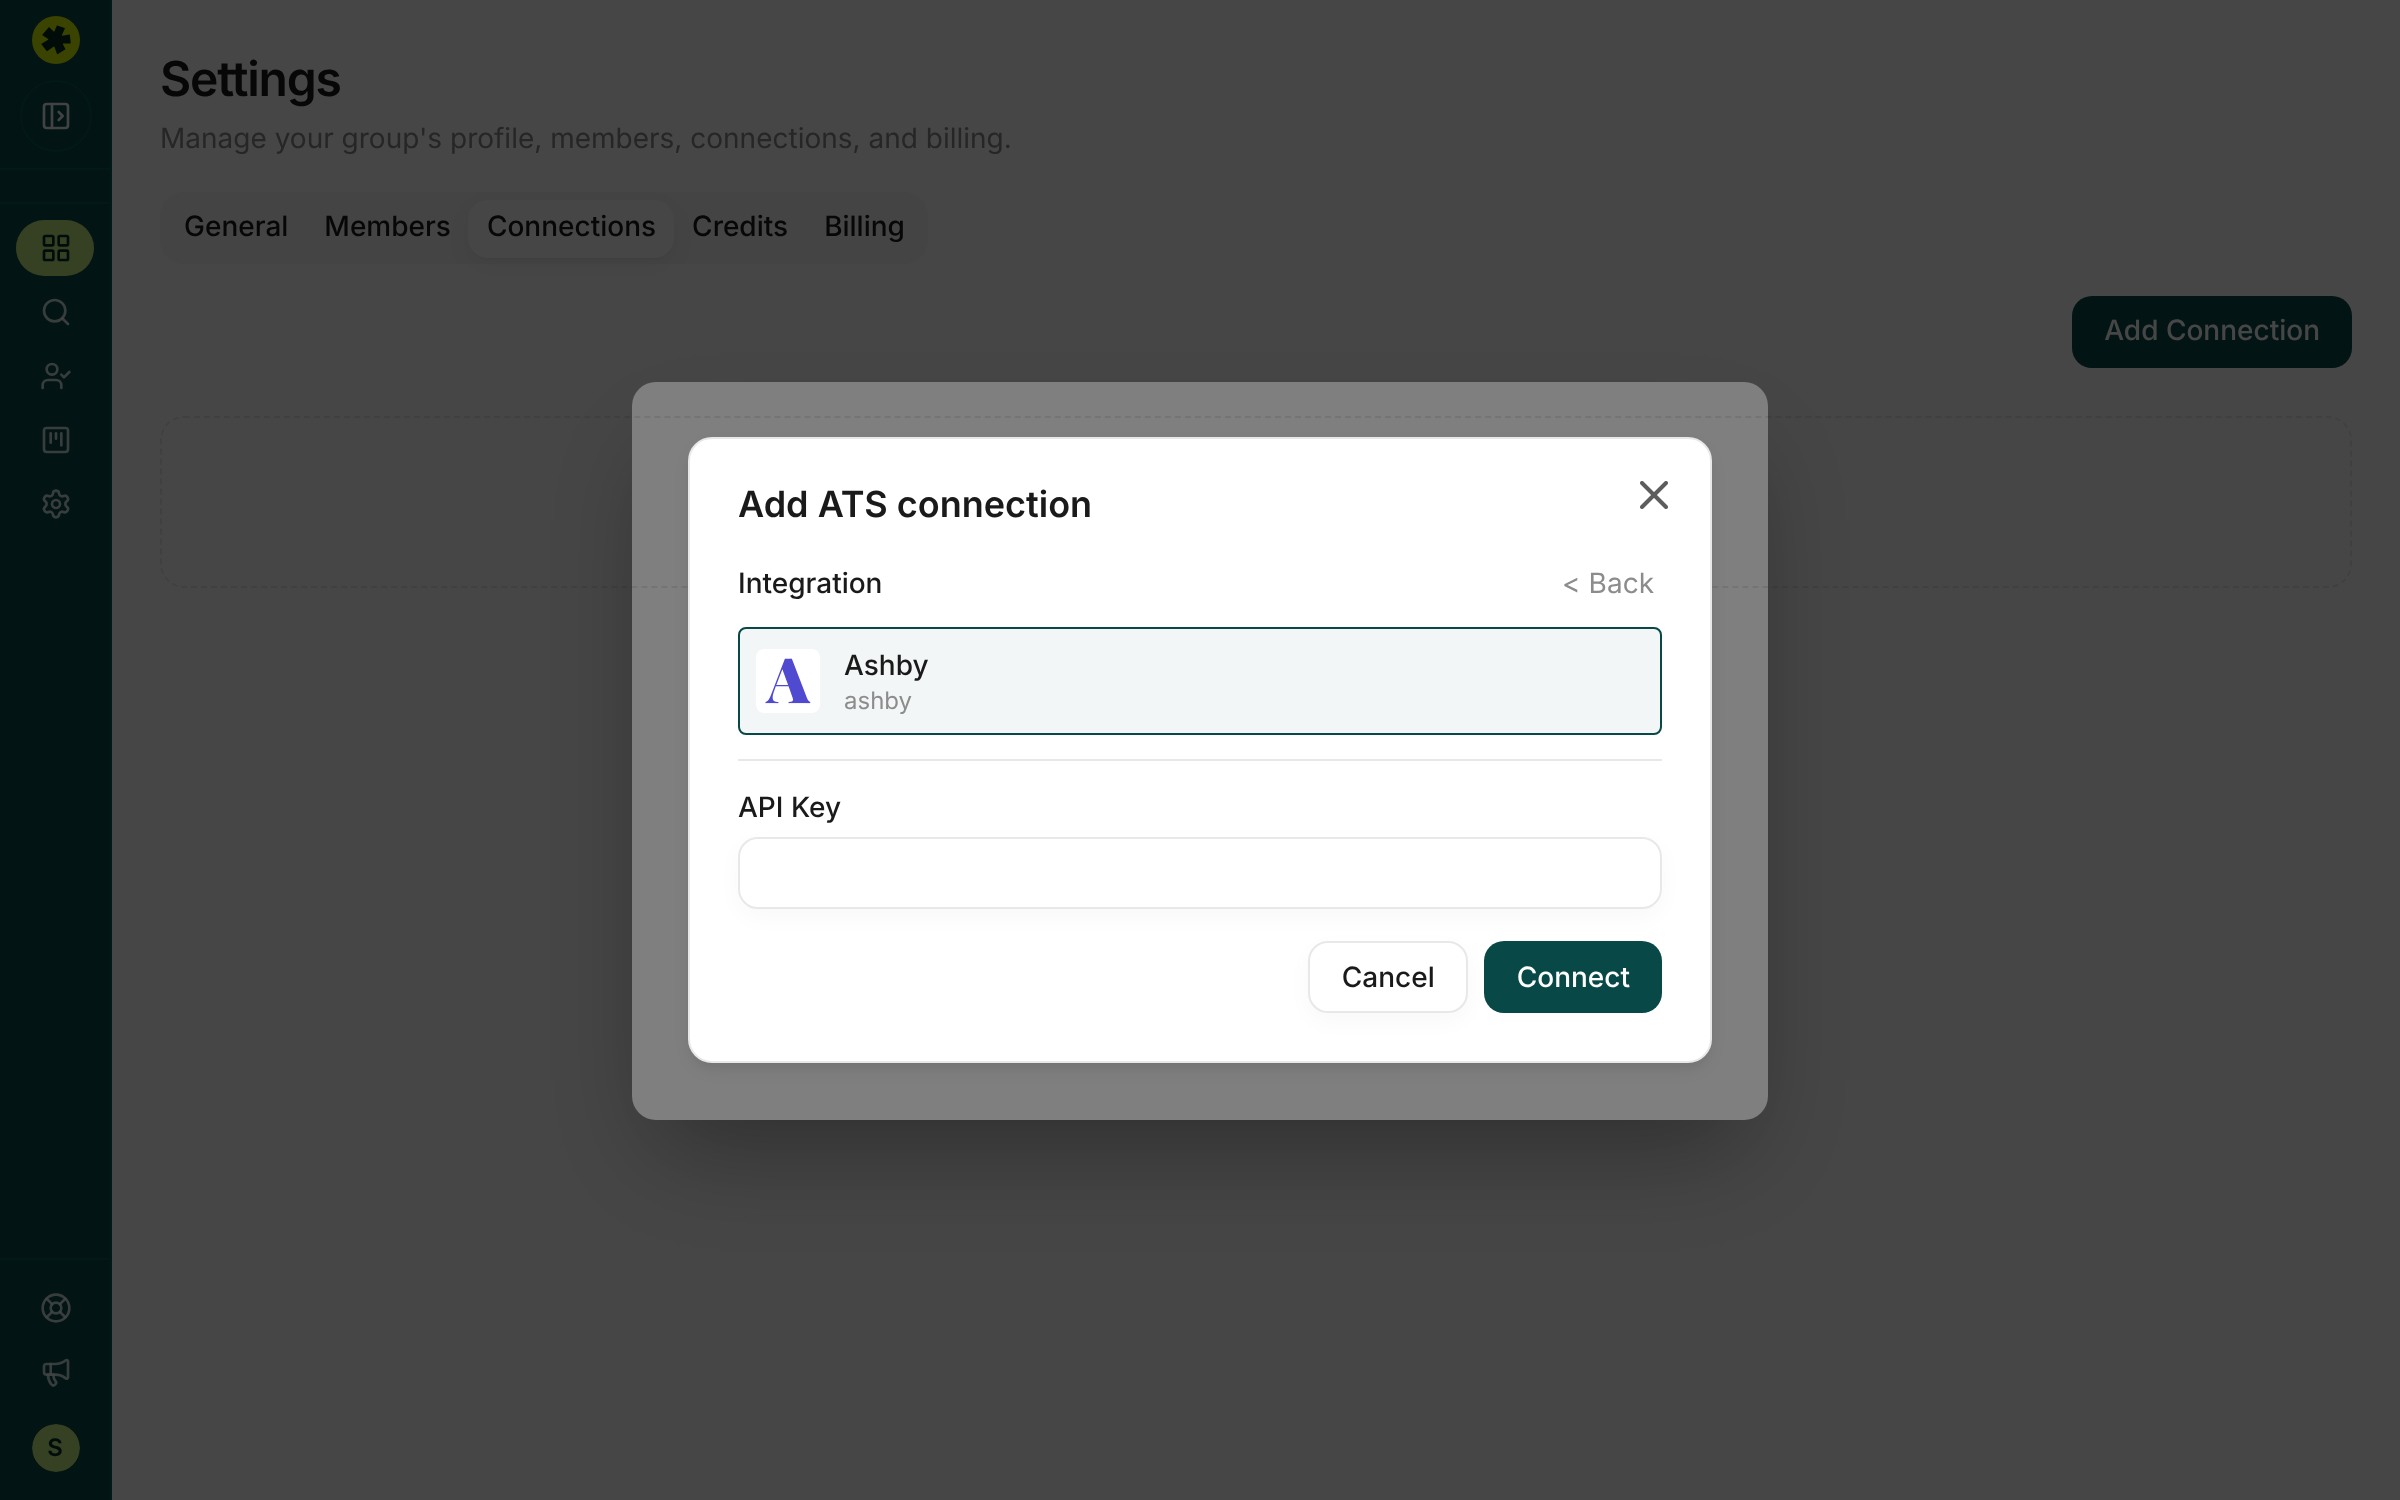
Go to Settings → Connections, click Add Connection, and choose Ashby. Paste your key into the API Key field and click Connect. There's no subdomain to enter for Ashby.
Two things worth knowing:
- Only Owners and Admins can add a connection. Recruiters can use one that's already set up.
- Your org keeps one Ashby connection at a time. To swap keys, delete the current connection and add the new one.
Optional: create a "Pickle" source in Ashby
In Ashby, go to Admin → Sources and create a source named Pickle. Pickle can't create it for you, so it looks it up by name. With it in place, every candidate Pickle sends is credited to the Pickle source in your Ashby reports. Without it, exports still work and candidates are still marked with a Pickle tag and note, but the source field is left empty.
Push candidates to Ashby
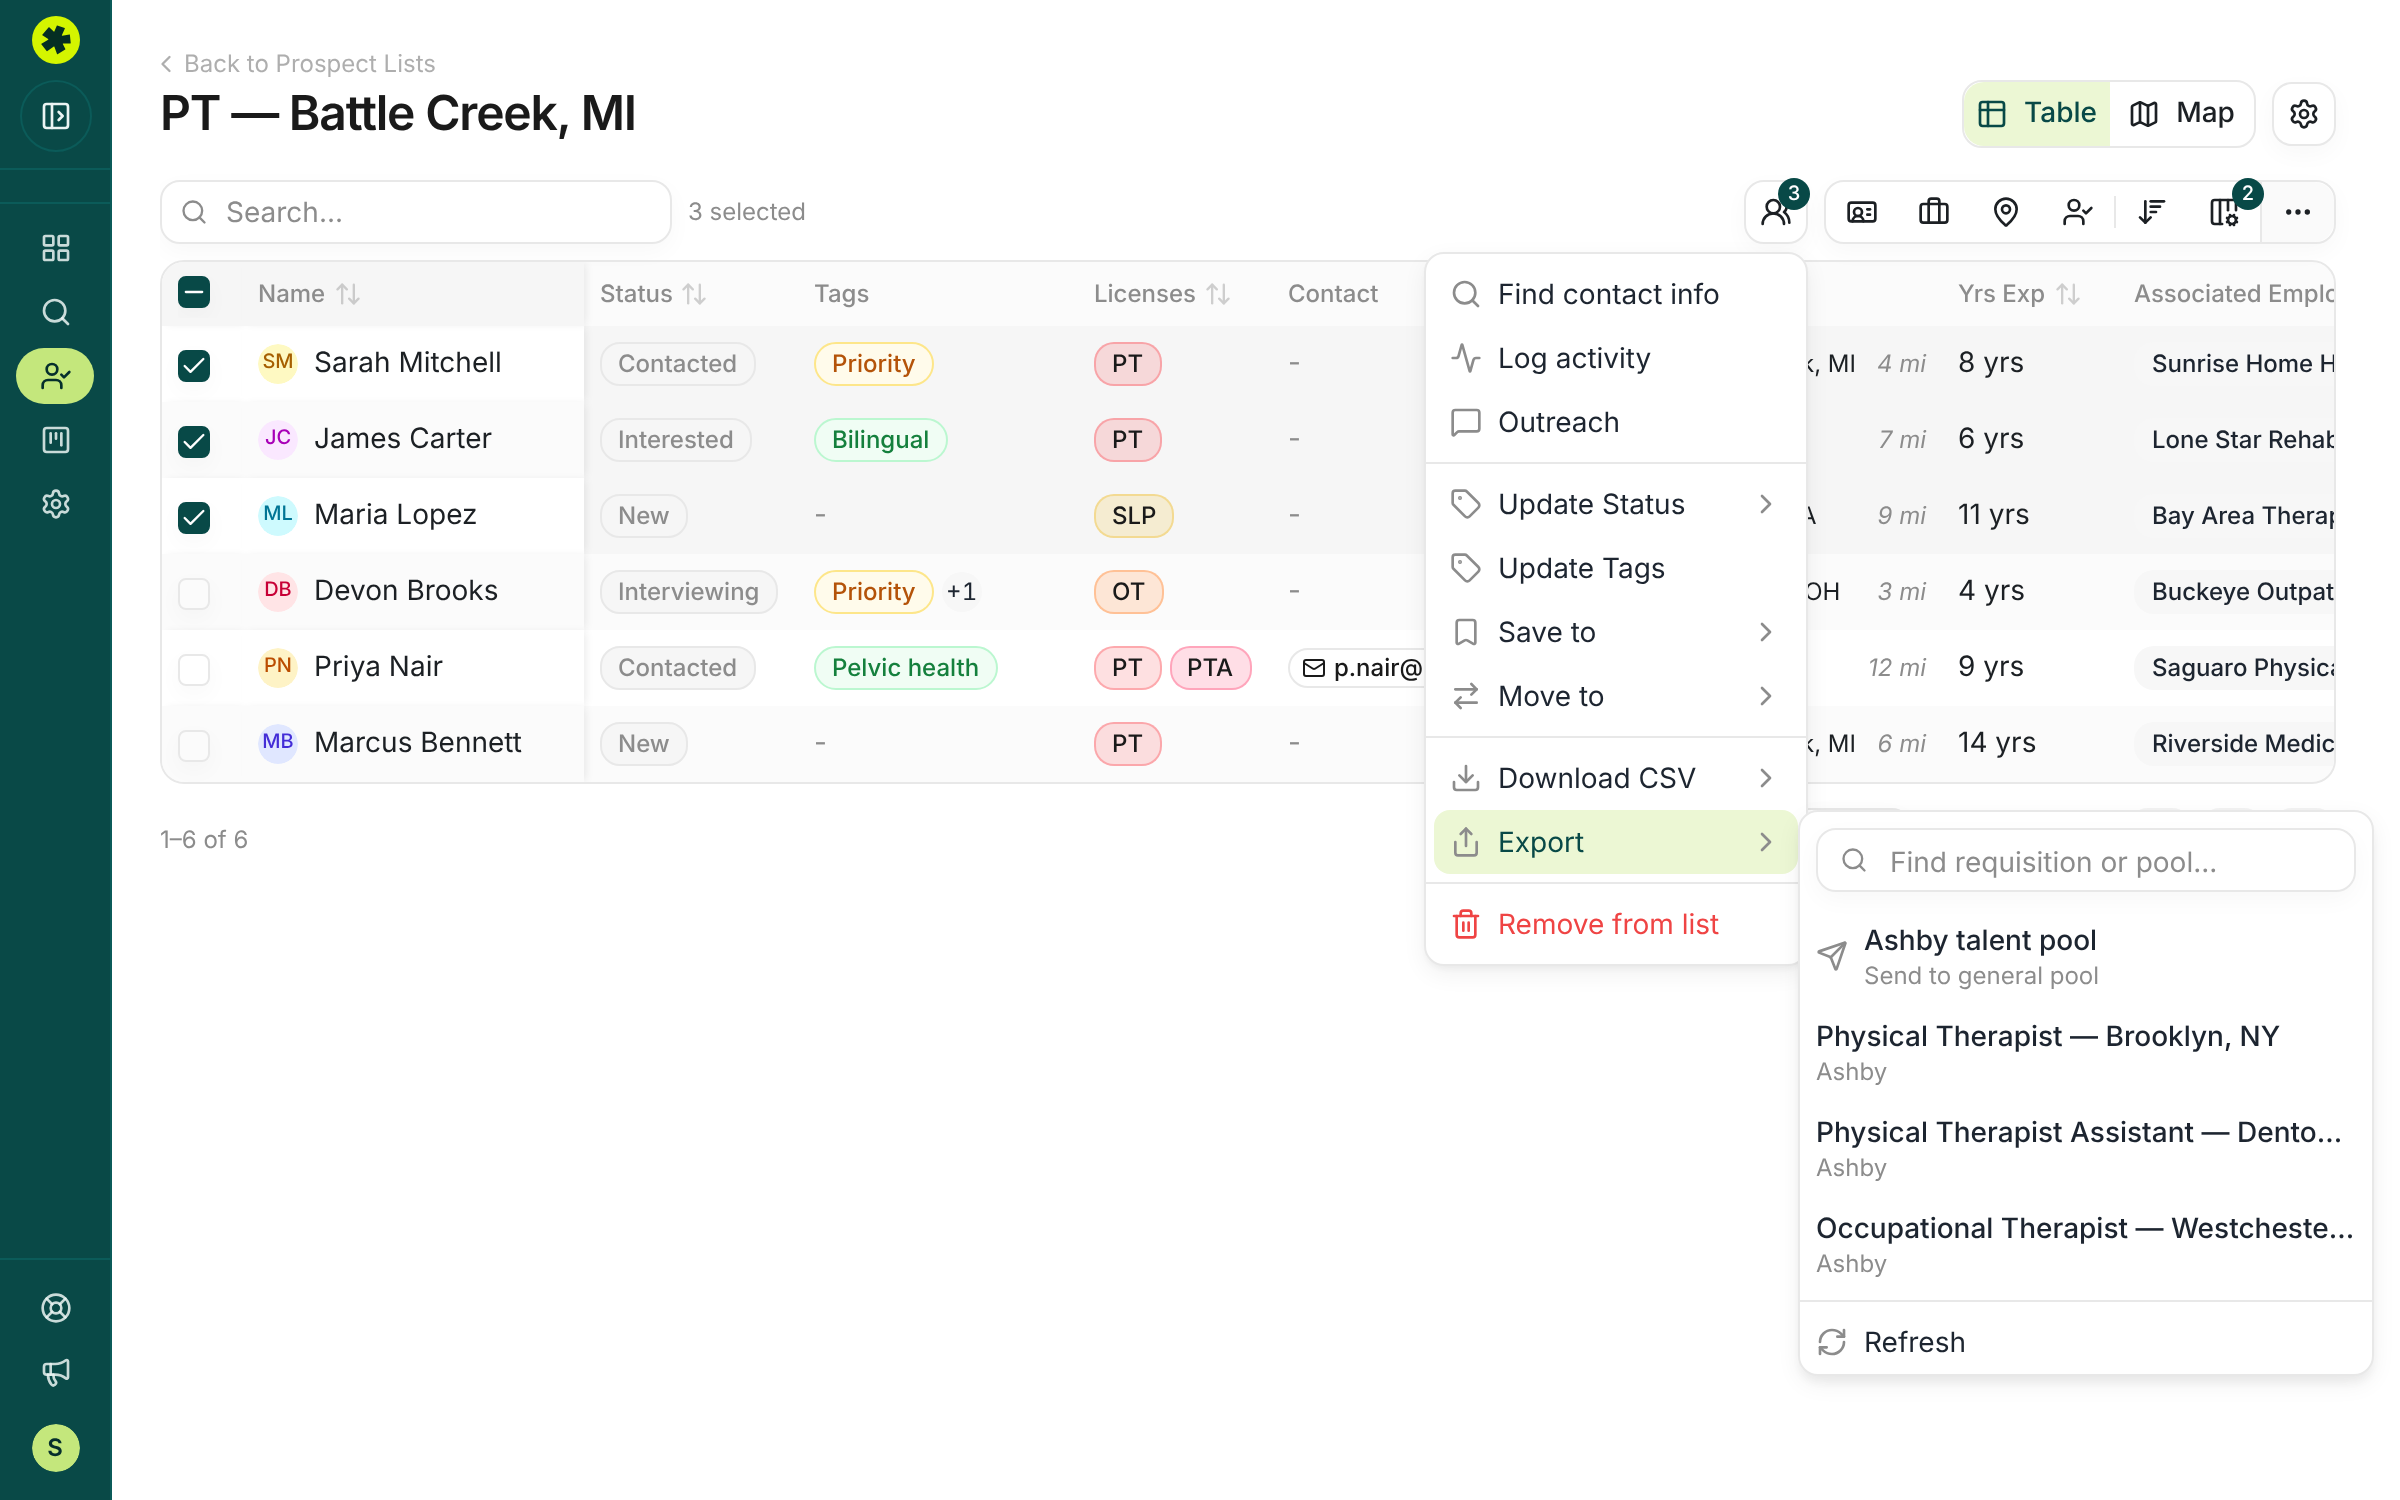
Open a prospect list and check the candidates you want. Click Actions in the toolbar, hover Export, and pick where they should land:
- Ashby talent pool adds them to Ashby as candidates with no job attached.
- A job name adds them and applies them to that job.
Pickle only sends candidates into jobs that already exist in Ashby. Open jobs are listed newest first. Use Find requisition or pool… to filter a long list, or Refresh to re-pull from Ashby. A message confirms how many were sent and names the reason for any that weren't.
If the message says some candidates are unconfirmed, the send may still be finishing. Check the job in Ashby before exporting them again, or you could create a duplicate candidate or application.
What lands in Ashby
When Pickle creates a new candidate in Ashby, they carry their name, email, phone, and LinkedIn profile, plus their Pickle tags and a Pickle tag so sourced records are easy to find. Details Ashby has no field for, such as current employer, specialization, address and other social links, are added as a note along with your logged notes and contact attempts.
Ashby has no way to update an existing record, so Pickle searches by email first. If the candidate is already in Ashby, Pickle reuses that record instead of creating a duplicate, and skips the application if they've already applied to that job. For these matched candidates Pickle doesn't add tags or a note, so don't expect to find the Pickle tag on them. The only thing it adds is the Pickle source on a new application, if you chose a job. If one email matches several Ashby candidates, Pickle uses the oldest, so it's worth merging the duplicates in Ashby.
Candidates need at least one contact channel, or they're skipped. Where there's no email, Pickle sends a placeholder address (pkl+…@test.withpickle.com) because Ashby won't accept a candidate without one. Swap it for the real address once you have it.
Troubleshooting
Pickle rejects my API key when I click Connect.
Check that the key has all four permissions listed above, especially API Keys read. If a permission is missing, create a new key with the full set and try again. Also make sure you copied the whole key, with no extra spaces.
I can't find Pickle in Ashby's integrations list.
You need Ashby admin access to see Admin and Integrations. Ask an Ashby admin at your company to create the key for you, or to update your permissions. If you're an admin and Pickle still isn't listed, contact the Pickle team using Contact us in the sidebar.
The Export menu only shows "Ashby talent pool", where are my jobs?
Click Refresh first. Only open jobs are listed, so if Ashby has none, you'll only see the talent pool. Exporting to the talent pool works either way.
An export failed with a permission error.
The key is probably missing a permission, or was deleted or disabled in Ashby. Create a new key with the full permission set, then delete the Ashby connection under Settings → Connections and add it again with the new key.
The message says some candidates are "unconfirmed."
The export timed out or the connection dropped before Ashby answered, so it may still complete. Check Ashby for those candidates before you export them again. Re-exporting right away can create duplicates.
Some of my candidates were skipped.
Those candidates have no contact info on file yet. Run Find contact info on them, then export again.
Related articles
Connect and push to your ATS
Link your ATS or CRM and push candidates straight into it — no manual CSV import.
Exporting & ATSConnect Lever and push to a posting
Link Lever once, then send prospects into Lever — to the general pool or straight onto an open posting.
Exporting & ATSConnect HubSpot and push contacts
Link HubSpot once, then send prospects in as contacts — matched on email so existing records get updated.